 MakerSketch Docs
Tools
Loft
Blend one shape into another on the way up, such as a wide circle rising to a narrow one.

A loft joins two or more flat shapes and fills in the solid between them. Where an extrude keeps the same shape all the way up, a loft changes it: a wide circle can narrow to a small one, a square can rise into a circle.
When to use it
- Use Loft when the shape changes on the way up: a cone for a funnel, a tapering handle, a nozzle, a square base that becomes a round top.
- Use Extrude when the shape stays the same all the way through. If only its walls should lean a little, give the Extrude a Draft instead.
- Use Revolve for something round whose side curves, like a cup or a knob: you draw the side and it spins it round.
Make a cone from a large circle to a small one
This example makes a cone with its top cut off: a 40 mm circle rising 30 mm to a 15 mm circle.
-
In a part, tap
Sketch, thenOn Top. Draw a circle with its centre at 20,20 and a radius of 20, then a second circle on the same centre with a radius of 7.5. TapFinish Sketch.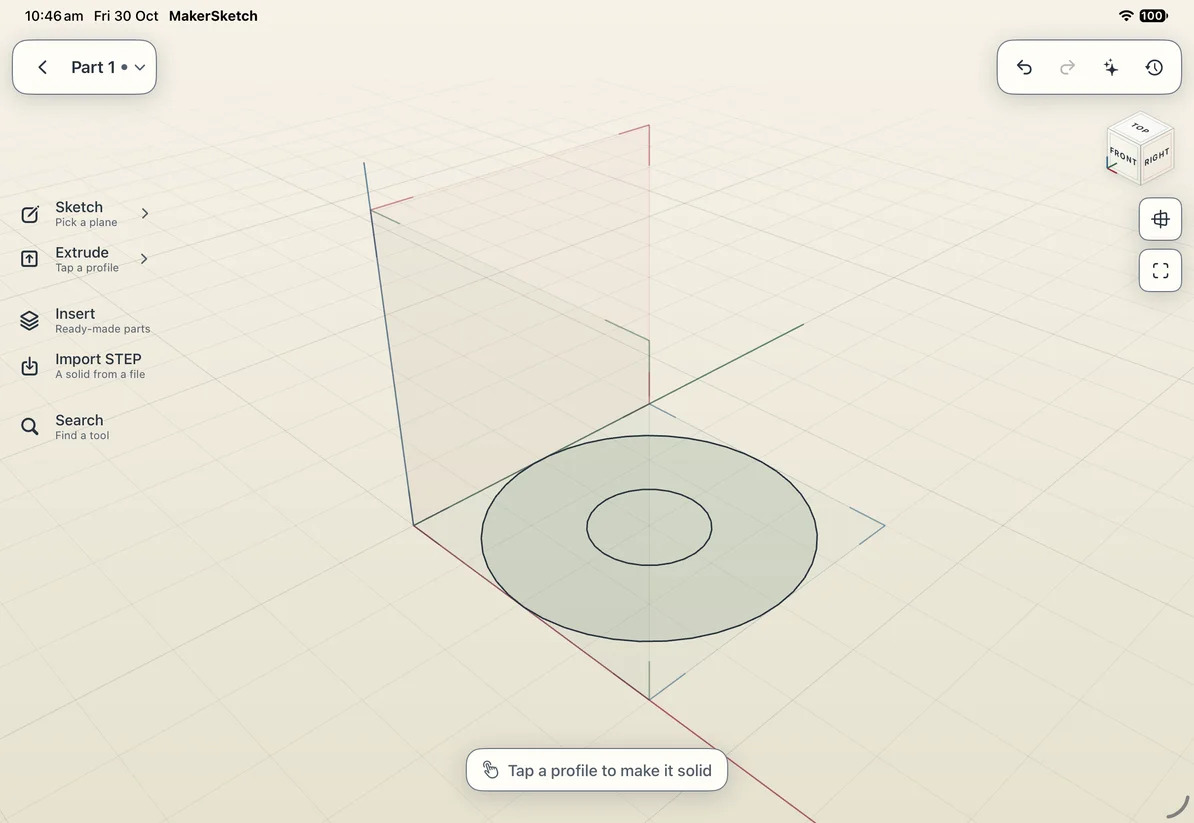
Both circles are shaded: each is a profile Loft can use. -
In the rail, tap the arrow beside
Extrudeand chooseLoft. MakerSketch says "Tap profiles in order to loft". -
Tap the big circle, then the small one. The first one you tap stays on its plane. Shapes on the same plane stack up in the order you tap them, spread evenly over 20 mm to start, and the solid between them shows straight away, with an arrow on its top and the Loft bar along the bottom.
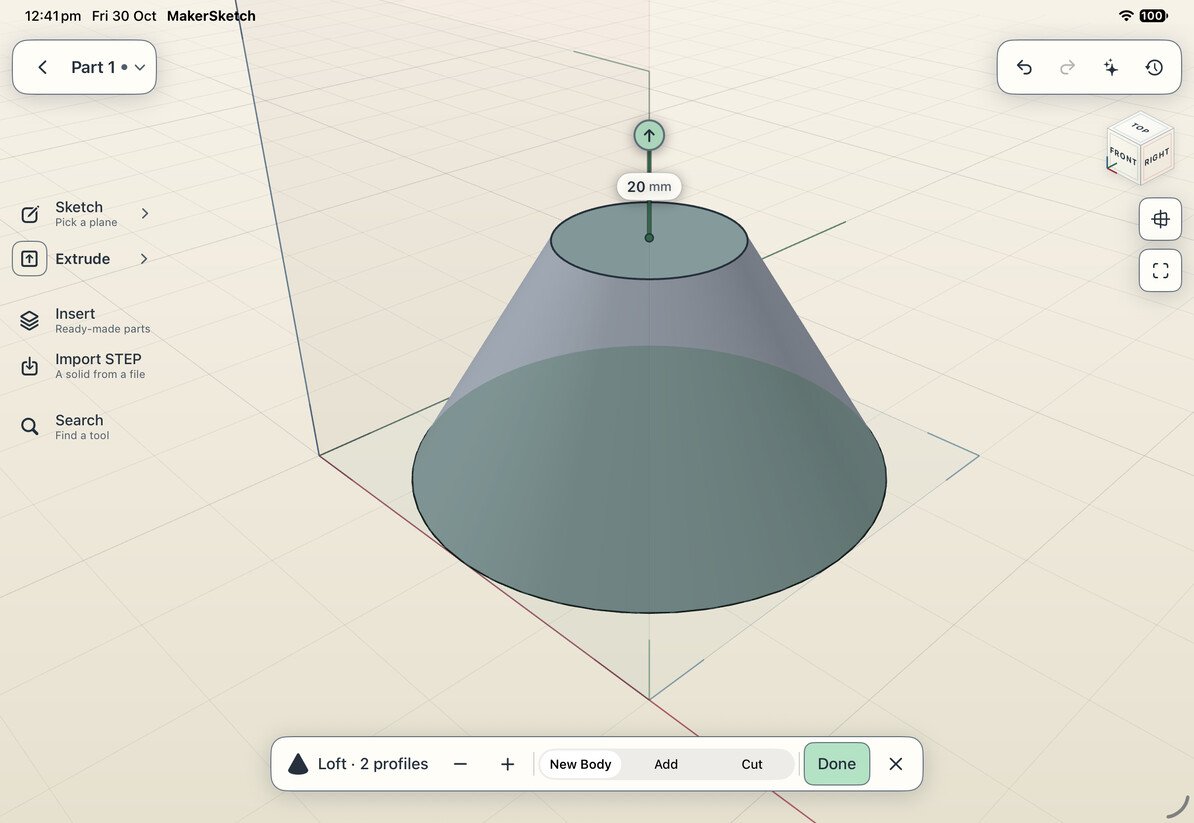
The preview, its height arrow and the Loft bar. -
Drag the arrow to make it taller or shorter, or tap
−and+on the bar. For an exact height, tap the number beside the arrow, type it on the keypad (30 here), and tapSet. Set makes the loft at once.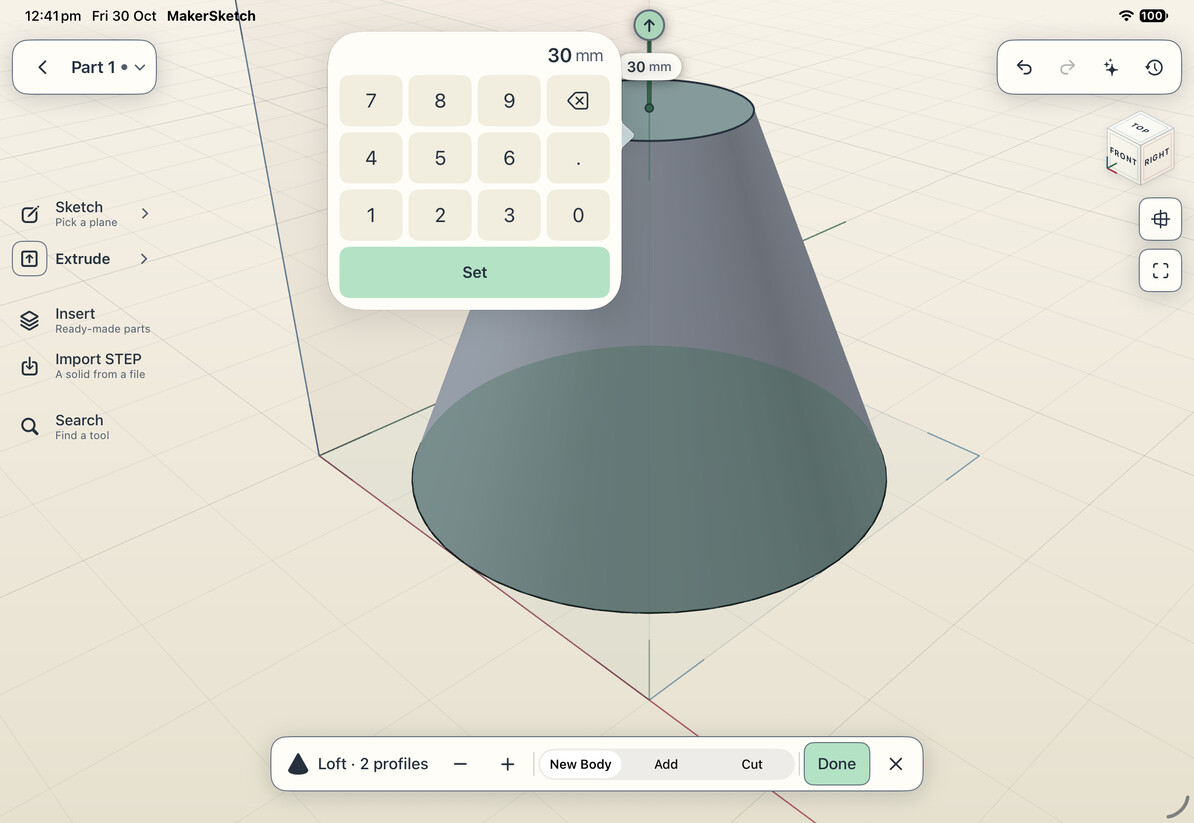
-
If you dragged instead, tap
Done. MakerSketch says "Lofted 2 profiles" with anUndobutton, and the loft joins the part's History. The two circles are used up by it, as an extrude uses up its shape.


Cut a tapered hole
A Cut loft takes a shape that changes on the way down out of a Body: a hole that's wider at the top, a funnel's throat, a seat for a cone. This example cuts a hole through a 10 mm block, 24 mm across at the top.
-
Make a block: sketch a 40 by 40 mm rectangle on Top and extrude it 10 mm.
-
Tap the block's top face to start a sketch on it. Draw a circle with its centre at 20,20 and a radius of 12, then a second one on the same centre with a radius of 6. Tap
Finish Sketch. -
Tap the arrow beside
Extrudeand chooseLoft, then tap the big circle, then the small one. The bar starts onNew Body, and a new Body has to start on the grid, so the card above the bar says "A new Body's loft starts on the ground (Z 0)" andDoneis greyed out. -
Tap
Cut. From a face, a Cut goes into the Body: the big circle stays on the top face and the small one sits 20 mm below it. The preview shows the block with the hole taken out, and the shape being cut away in see-through red, as Extrude's Cut does, down to the arrow.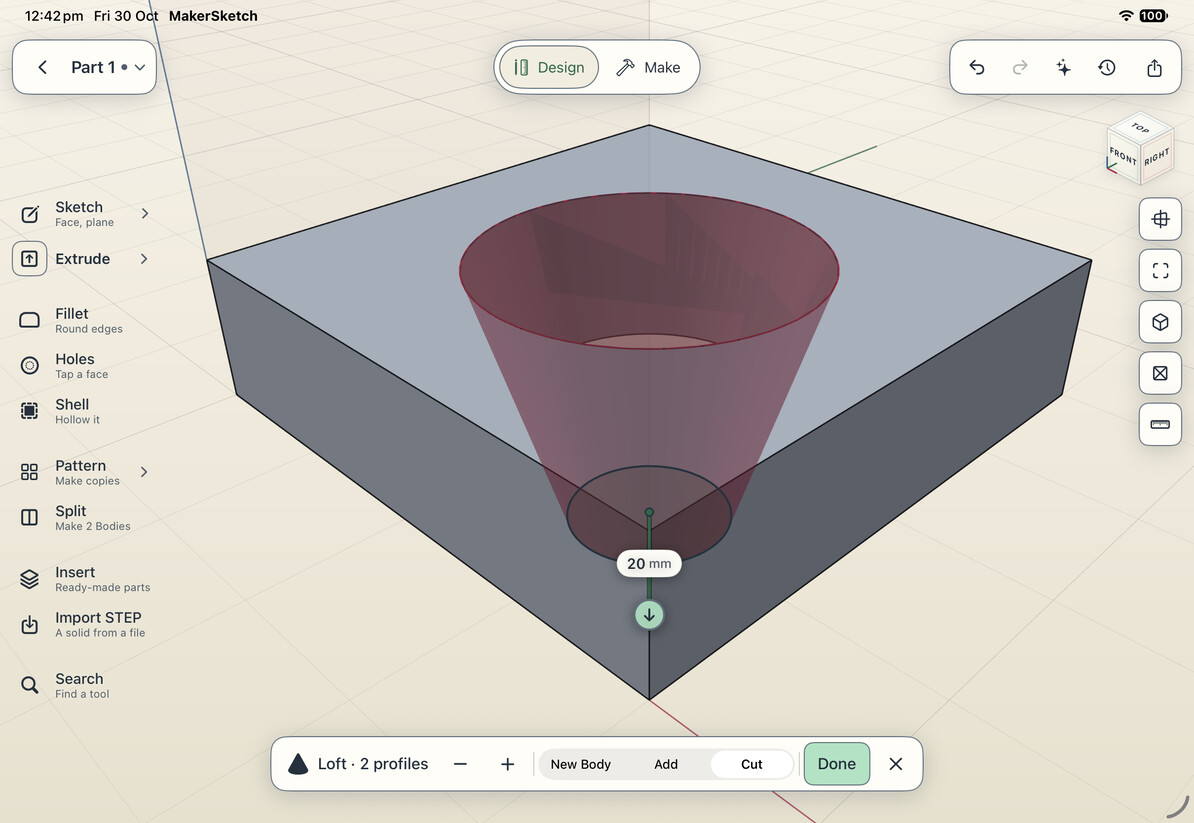
-
Tap
Done. MakerSketch says "Lofted 2 profiles" withUndo.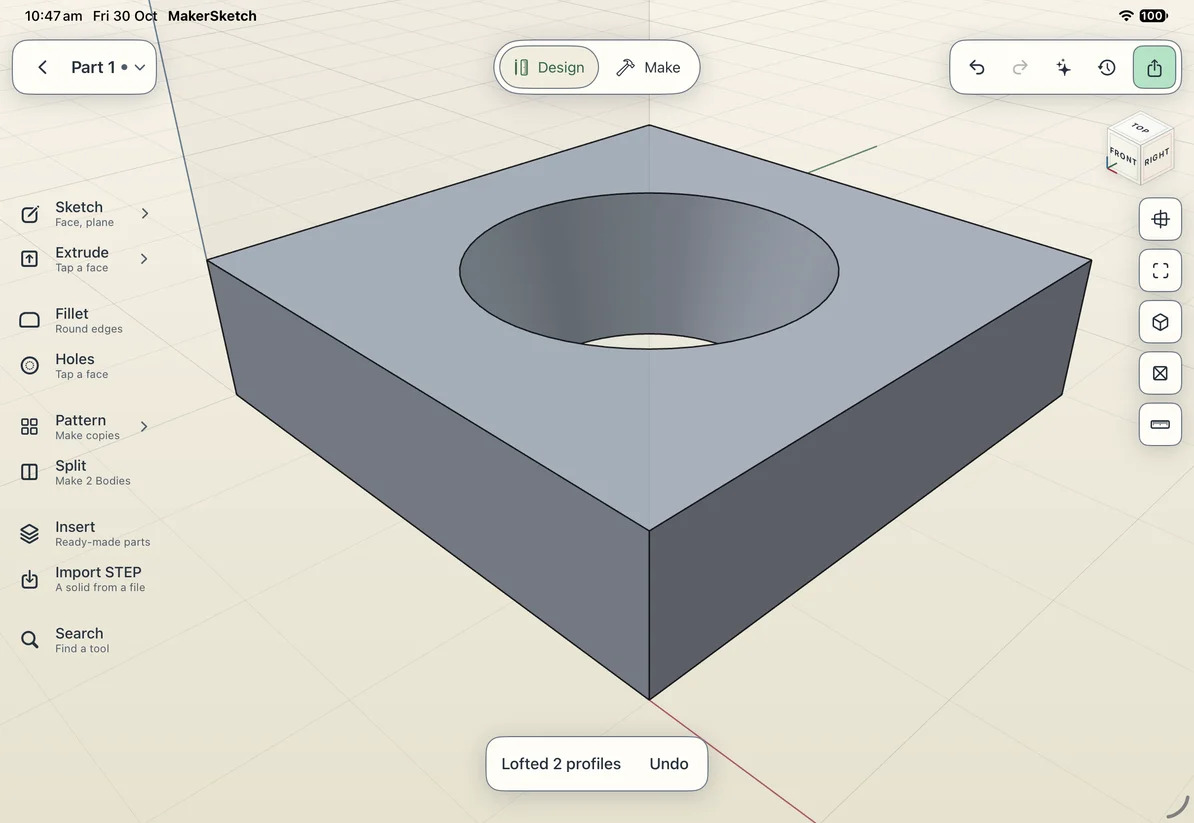


The loft is 20 mm tall and the block only 10 mm, so the hole comes out halfway down the taper: 24 mm across at the top and 18 mm at the bottom. The cut can reach past the bottom of the Body (and below the grid) because it only takes material away. For a tapered pocket that stops inside the block instead, tap the number beside the arrow and type a height less than the block is thick.
Loft between shapes on different planes
The shapes don't have to be on one plane. Sketch each on its own flat face facing the same way, such as the top of one block and the top of a taller one, then tap them with Loft: each shape stays where you drew it, and the loft joins them. Dragging the arrow then stretches the spacing, keeping the first shape you tapped where it is.
Change its height later
Tap the History button. The loft is one step with its height beside it. Tap the height, type the
new one, and tap Set: the shapes keep their sizes and only the distance between them changes.

Options
| Option | What it does |
|---|---|
| Height | How far the last shape is from the first one you tapped, in millimetres: drag the arrow, tap − or +, or tap the number and type. |
New Body |
Makes a separate solid (a Body). A new Body starts on the grid, so the first shape must touch it. |
Add |
Joins the loft onto the Body it touches: a tapered peg on top of a block, say. It may start below the grid if a Cut then trims it flush. |
Cut |
Takes the loft away from the Body it goes into: a tapered hole. It may reach past the Body and below the grid. |
Unlike Extrude, Loft doesn't guess: it does what the bar shows, New Body to start. Add and Cut
work on the Body the loft overlaps or touches. Shapes stacked on a Body's face rise out of it for
New Body and Add, and go down into it for Cut.
What a loft can be
- 2 to 32 shapes, tapped in order, each on a plane facing the same way (all on Top and the faces above it, say).
- Each shape points outwards all the way round: a circle, a rectangle, a polygon. A star, an L or a C shape can't be lofted.
- The shapes can have different corners: a square can loft to a circle. Between two shapes the side is straight; for a curved side, loft through more shapes in between.
- No holes, unless the hole is one of the shapes you tapped, like the small circle in the cone.
Tips
- Tap a shape again to leave it out of the loft.
- Tap the
×on the bar to put the shapes back without making anything. - Search finds Loft as "blend", "taper" and "transition" too.
If it won't work
Loft isn't in Extrude's menu
Loft needs two shaded shapes that nothing has used yet. Sketch a second shape, or check the first sketch's shapes are closed (they're shaded when they are).
The bar says "Loft can't use a shape with an inward corner"
One shape has a corner pointing in, like the inside corner of an L. Loft only joins shapes that point outwards all the way round. Draw it as a rectangle, a circle or a polygon instead.

Done is greyed out
The bar's card says why: usually that only one shape is picked, so tap a second one. On a Body's
face, it's often that the bar is still on New Body: tap Add or Cut.
I made the wrong loft
Tap Undo on the message, tap undo in the top bar, or tap the screen with two fingers. The
whole loft is one undo step.
Messages you might see
When MakerSketch can't make the loft, the card above the bar says why. Each message, and what to do.
Picking the shapes
Its height and place
Joining the Body
Changing it in History
Bending it in History
Checking a passage
In the Assembly view
Bend a loft
In History, set a Loft’s Bend angle: 0° is straight; use ±0.1–170° for a circular centreline. Set its span first: the span is the centreline arc length. Positive angles turn toward the section plane’s +u direction. Sections must share a centre and matching corners. Each section turns perpendicular to the curve; a tight bend that folds through its inside radius is refused. Bend and Twist cannot be combined.
Start angle leans the loft away from its plane at the first section, so it leaves at a slant with its sections square to the path, like a ramp up through a hull. Bend direction says which way it leans and bends, in degrees in the section plane: 0° is +u, 90° is +v. On the Right plane, a Start angle of 30° with a Bend direction of 90° climbs at 30°, and a Bend of -36° then levels it out to 6° below level. A leaning new Body tips below Z0, so lean an Add or Cut on a Body. An Add may overshoot below Z0 while you build, and a Cut trims it flush: a thin wall on a flange.
Run a thin wall up from a flange
Water in a duct wants a thin wall that follows it, on a flange that bolts down. A wall that leans can't start on the grid, so it starts below and gets trimmed. Don't start from a solid block round the water: it's heavy, it hides the shape, and it isn't how a duct is made.
- Make the flange: a thin plate on the grid, as a
New Body. - Loft the wall as an
Add, with its Start angle and Bend in History, starting far enough below the grid that all of it comes up through the flange. MakerSketch says how far it reaches below Z 0: that's expected, for now. - Trim it flush: sketch a rectangle on Top round everything below the grid, tap
Extrude, thenCutandFlip, and make it deeper than the wall reaches. The Body now rests on Z 0 and every step stays in History to edit. - Cut the water with a smaller loft on the same path. Make its sections the wall's less the thickness you want, 3 mm, say, so the wall stays even all the way.
The radius and smallest control-section area describe the nominal shape. They do not measure installed obstructions, wall thickness or flow. For a passage, use an outer loft and a smaller bent Cut reaching both ends. Shell does not hollow a bend. Measure the resulting walls independently. Bend before adding face sketches or holes. The surface is a bounded mesh approximation sampled at no more than 2° per span, not a spline surface.
Check a passage (development)
In History, use Check passage on an untwisted Cut Loft that represents the water volume. The report subtracts saved assembled Bodies and hardware envelopes from that volume, tests whether the two ends connect, and samples free section area. It probes 0.05 mm past each end to catch a cap just beyond the cut. It does not prove that the rest of the housing is sealed.
Enter an assumed flow in L/min to see section mean speeds. The calculation uses steady incompressible continuity, Q = A × mean speed. It does not predict delivered flow or pressure loss and is not CFD. Sections are sampled at up to 1/64 of the span plus control sections, so a narrow partial restriction between stations may be missed. Connectivity is evaluated separately on the native mesh volume. Changes to geometry or placement invalidate the report. Hardware uses its saved nominal shape, including conservative layout envelopes where supplied.
Last updated 30 October 2026, for MakerSketch 1.0.